While waiting for my Brown/Aluminium Putty to arrive I started working on a horde of Plague Zombies. I was gathering different bits and pieces over the last couple of month to build Zombies that resemble former Imperial Guard Soldiers without using the Zombies from Games Workshop as they are completely out of proportion and simply look goofy.
The different components I am going to use for the 70 Zombies I plan to build are:
- Zombies from Mantic Games
- Ghouls from Mantic Games
- Conscript Legs from Victoria Lamb Miniatures
- Cadian Shock Troops Bits: Helmets, Canteens, Lasguns, Knifes, etc.
- Custom Made Hollow Bases for the Swamp Theme of my Nurgle Forces
- Rivets from a used Water Filter & Greenstuff
I am going to mix and match all the different parts as I see fit: some of Zombies will get helmets, some of them will get boots/not as ragged combat trousers made out of the Conscript Legs, some of them will get a lasgun or other weaponry in their undead hand to smack down enemies, some will get some extra guts hanging out of their open bellies... and all of them will get pustules and stand ankle-deep in swamp water (just like my Nurgle Daemons).
As a little proof of concept - having an idea is one thing, actually implementing is something completely different - I build a prototype:
The Zombie wasn't too complicated to assemble, I just have to make sure that I do the basing before I put the torso/arms/head on legs when I go into mass production. This way it will be easier to get the filling putty and the sand into the hollow base.
This blog is a digital diary and dedicated to tabletop gaming and everything related to it: building, converting and painting miniatures, building terrain, thoughts on rules, armies and strategies... and many things more.
Montag, 29. Juni 2015
Sonntag, 28. Juni 2015
40K Tournaments: A Blast From The Past
Back then (almost 20 years ago) I used to attend tournaments. Since then my hobby focus has changed: for me it's all about the modelling and painting, about interesting scenarios and about the narrative - I am a fluff player.
But I am curious - especially after hearing/reading all the rants about new and overpowered codex-books (I couldn't care less) - and so I joined a couple of guys of the local gaming group and went to a tournament last weekend. I didn't play, I was just there to watch, listen and to take photos. And it was very interesting.
Yes, there were - in my opinion - awkward armies: I never ever would for example allies my Raven Guard with another Space Marine Chapter to get the benefit of a specific unit or special character. I have noticed that a lot of tournament players are solely focused on optimizing their army (while dealing with tournament specific restrictions) and to me it is a pity as it means that you miss out on a lot of all the great things of the hobby like campaigns and scenarios, formations or the extra bits like Kill Team or Zone Mortalis.
Two things I didn't understand at all
1. Messy gaming tables: I really don't get why there is food and drinks or stacks of paper on a table. There only should be aside of the armies (of course), terrain, objective markers, some dice, templates and the measuring tape (and even those I put aside when it is not my turn).
2. Bad treatment of miniatures: I saw miniatures just thrown in a box or piled up to a heap like if you didn't had to invest any time or money to get them on the table. This actually made me very sad.
Nonetheless it was a positive experience. The atmosphere was, even though it was all about the competition, friendly, and it was great to see some well painted armies on the table and to have some really nice conversations. Being at the tournament, even though I was just a fly on the wall (how fitting for a follower of Nurgle), definitely fired up the hobby engine to get "stuff done", and maybe I will even attend one in the near future as an active player as well.
Two things I didn't understand at all
1. Messy gaming tables: I really don't get why there is food and drinks or stacks of paper on a table. There only should be aside of the armies (of course), terrain, objective markers, some dice, templates and the measuring tape (and even those I put aside when it is not my turn).
2. Bad treatment of miniatures: I saw miniatures just thrown in a box or piled up to a heap like if you didn't had to invest any time or money to get them on the table. This actually made me very sad.
Nonetheless it was a positive experience. The atmosphere was, even though it was all about the competition, friendly, and it was great to see some well painted armies on the table and to have some really nice conversations. Being at the tournament, even though I was just a fly on the wall (how fitting for a follower of Nurgle), definitely fired up the hobby engine to get "stuff done", and maybe I will even attend one in the near future as an active player as well.
Donnerstag, 25. Juni 2015
Nurgle Heldrake - Blight Drake – Coversion WIP: Greenstuff vs. Brownstuff
I started modelling the carapace using Greenstuff and ball-shaped pluggers. The goal was to reproduce the "hammer finish" look of the armour of the headpiece of the drone.
It all went off quite well; I was able to sculpt the basic shapes and get some proper dents into the putty. However, the end result wasn't satisfying at all.
Even though I worked with Greenstuff before on various miniatures I wasn't aware that it has some kind of "memory effect" - that's what I have learned after doing some online-research. So, Greenstuff tends to forms/bounces itself back to its former shape; it is not a lot, but enough to soften up modelled hard edges. And this is exactly what happened to the "hammer tends" on the carapace: they turned into some soft organic looking mush that has nothing in common with how the headpiece looks like (I am frustrated, so I am a bit exaggerating).
I did some tests and in theory I could wait 90-120 minutes until the Greenstuff has tried up to a state where it is not forming back, but then it also will be difficult to get into shape in general, and it is not guaranteed that I will get the hard edges that I want/need. Waiting that long to try hope that it will work out for each segment of the carapace is too risky: I need a procedure that I can reproduce to create a consistent look.
I started with looking for an alternative modelling putty. I ended up with ordering a pack of Brown/Aluminium Putty by P3. Due to aluminium particles it's supposed to hold up sharp edges and therefore is "ideal for modelling armour or weapons". I hope that this is case.
All I have to do now is waiting for the Brownstuff to arrive.
Dienstag, 2. Juni 2015
Nurgle Heldrake - Blight Drake – Coversion WIP: Carapace
After my short excursion with my Raven Guard I am back on track with the Blight Drake. After finishing the body I started working on the carapace. As a first step I mapped out how I want to create the carapace using Photoshop. Doing some mock ups digitally gave me a good idea on the ideal number (and size) of segments as well as on the concavity of the carapace.
I then started modelling the carapace with green stuff, starting at the very with a small segment as a proof of concept. To make sure I am able to reproduce the same "hammer finish" look of the armour of the original drone I bought some ball-shaped pluggers on ebay. I was quite happy with the result of the armour. Something I wasn't happy with at all were the edges of the carapace segment. The resin parts are too thin and fiddly to reproduce them with Greenstuff in a proper way (at least for me).
So I went back and segmented the carapace of the Blight Drone using Plasticard. It took some time to get the shape and size of all the different archs right, and a little bit of more time to actually to fit them into the back, but it spending the time was worthwhile. Now I not only have a proper template for each segment, the Plasticard also helps to reproduce the same look and quality of carapace of the original model.
Next step is actually (and finally) start modelling the carapace. I am really looking forward to it, especially when it comes to modelling all the corroded elements - I assume it will just as fun as working on rotten flesh (this sounds weird).
Labels:
40K,
Chaos,
Conversion,
Daemons,
Greenstuff,
Nurgle
Sonntag, 31. Mai 2015
Spreading the Focus: Raven Guard Centurions and Land Speeder Storm
I am fiddling around with the Blight Drake for quite some time. Good thing is that I am getting there. The Underbelly is done and now I have to work on the upper carapace (to then do the detail work on the belly). Bad thing is my progress is slow... simply because I don't have that much time for the hobby at the moment. It is exhausting and because of that I had to do something else, something were I can have something done rather quickly to have the feeling to have something accomplished.
So I did a little break from the Blight Drake and worked on some support for my Raven Guard. I started building a Landspeeder Storm (the more Scouts the better) and Centurions. Even though I couldn't resist to some minor adjustments to the models - I am going to remove all heraldry, icons, purity seals etc. from my Raven Guard - I was able to put the miniatures together rather quickly. And it was a joy not to worry and wonder about how you are going to put something together or how to model it, but to just glue it in place and its done. The only thing I still have to do building wise is to magnetize the weapons of the Centurions... but this is going to be a different story.
From now on I definite will work on two or three things in parallel to make sure to get some diversion. I always thought that this is bad, but with projects that drag along over weeks and months it is good and healthy and to be able to jump on something else to get some distraction and the feeling of having actually something accomplished.
Sonntag, 19. April 2015
Nurgle Heldrake - Blight Drake – Coversion WIP: Building the Body
As I have promised myself, here is a recent update on the so called Blight Drake. I am currently modelling the main body, which mainly consists of bloated, rotten and torn open old leathery skin. The more I work with greenstuff, the more fun it is. What is important, at least from my experience, is patience: the longer you wait/the more time you have to work on the sculpt constantly, the better you can work out the details. Wounds for example: I wait around 2 hours before I start sculpting them. By this time the greenstuff is firm enough to be cut and ripped open without damaging the base form; at the same time you still can shape it good enough. Same goes for the leathery texture of the skin, which I, in order to get the same look as the skin of the Blight Drone has, created by cutting the putty with a knife over and over again.
There are are some parts I am not so happy with, but once the base modelling is done (including the carapace) I will come back and fix those issues: it's minor things most people won't notice like wounds that are shaped too similar or wobbly body parts that don't hang correctly taken the slightly tilted stance the Blight Drake will have on the flight stand into consideration.
Labels:
40K,
Chaos,
Conversion,
Daemons,
Greenstuff,
Nurgle
Donnerstag, 16. April 2015
Nurgle Heldrake - Blight Drake – Coversion WIP: Foundation
My focus right now is to get a Nurgle army ready (again). Even though it should be painted I am currently more eager to get the troops ready for the table so I can play with them. The building will take time as I basically going to convert every miniature in the core army, which is based on Codex CSM. So before I start the painting, I will do a lot of building.
Something I was playing around in my mind is to build a “proper” Nurgle Heldrake. The dragon works for the Alpha Legion (just add two more heads), Iron Warriors or maybe even a Khorne army… but not for a Nurgle force (at least from my point of view).
I am a big fan of the Forge World Blight Drone, but unfortunately it is too small to be used as a Heldrake. So, why not let it grow into a… Blight Drake? That’s basically what I am trying right now.
The foundation of the model is a Blight Drone with a Tervigon’s spawning sack in the middle. I got the Blight Drone cheap on ebay… and it turned out to be a recast, which sucks. The quality of the cast is bad and the resin is brittle as hell, so all the details like the cables broke of by just looking at them. Not good at all. At the same time, I will have to do a lot of sculpting work anyway, so I will “just” spend some more time on fixing the crappy recast issues. One thing I learned already for the future: I will only order direct from Forgeworld again, even though I might hack and cut the miniature to bits and pieces for a conversion.
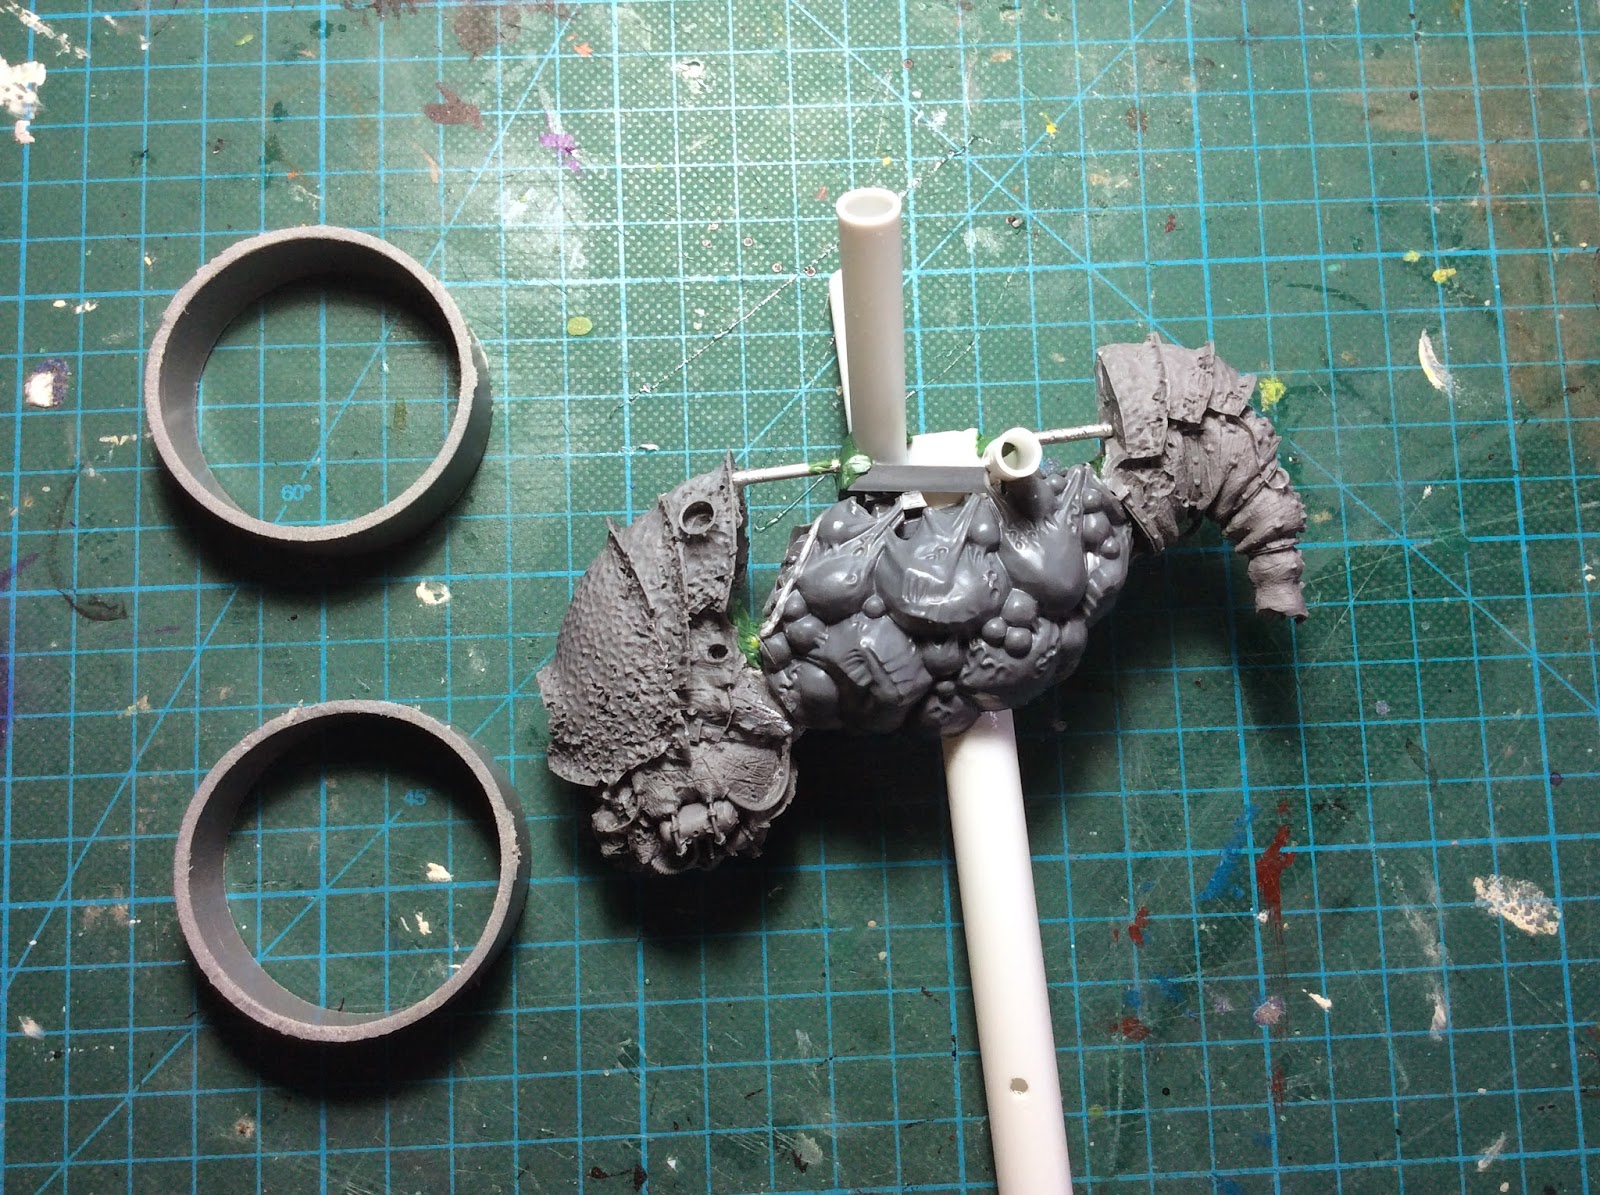
First step was to build the frame. After gluing the head- and tailpieces to the spawning sack – they were fixed with aluminum rod – I glued sprue pieces as some kind of artificial bones into belly to stabilize it. I also (something I forgot when I built the Daemon Prince) also inserted a piece of plastic rot for the custom flight stand in the middle of the daemon engine. While going crazy with the plastic rod I also added connection struts for the rotor arms and the exhaust pipes.
To get the base shape I crammed aluminum foil into the body, pressed and squeezed it around until I was happy and covered it up with green stuff – I trick I learned from good friend of mine (thanks Flo!).
After the base shape was established I started with the work on the belly. First I added some metal straps because the Blight Drone has those as well; they are basically holding the whole wobbly body together and I want this to be reflected on the whole model. To make sure they look consistent I removed all the resin studs from the Blight Drone pieces and replaced them with the “water-filter”-ones I used for the big straps on the neck and the belly. After adding some machine parts – I used bits and pieces from the Thanquol & Boneripper and the Stormfiends kits (I have more plans with those guys for the Nurgle force) – I started with the sculpting of the skin.
As with the Daemon Prince I want the look of the skin to be consistent. So I either sand of all the details of the skin of the Blight Drone or I re-sculpt the belly in a way that it looks the same. I go with the latter option. It is more work (and I have no idea if I can pull it off), but it also looks more disgusting.
While glue/green stuff was drying I worked on the rotors. As the whole body is bigger, those need to be bigger as well. At first I was a bit puzzled how to re-build them, but after a visit in the hobby- and the do-it-yourself stores I got plenty of plastic tubes, a drainpipe and a rough idea. Getting the base construction wasn’t too complicated, even though the sawing of the big grey drainpipe drove me crazy: I just wasn’t able to get two similar and (that was the hardest part) straight pieces. Around 7 attempts (including a lot of swearing, the usage of different saws and the building of a weird Skaven-style construction to keep everything in place) later I had two pieces that were good enough…they weren’t perfect, but they will be covered in green stuff anyway.
Building the inner construction with the plastic tubes was a lot of fun and I begin to understand why (especially Ork) players love to build custom vehicles. For cutting the rotors out of the rather thick plastic boards (2,5mm) I bought a special compass (with a knife instead of a needle/pencil lead). I took some time and some additional sanding, but without this tool I wouldn’t have been able to get the rotors the way I wanted them.
That’s it for now. I will continue sculpting the belly and, while waiting for the green stuff to get hard, drill more corrosion holes in the rotors.
Something I was playing around in my mind is to build a “proper” Nurgle Heldrake. The dragon works for the Alpha Legion (just add two more heads), Iron Warriors or maybe even a Khorne army… but not for a Nurgle force (at least from my point of view).
I am a big fan of the Forge World Blight Drone, but unfortunately it is too small to be used as a Heldrake. So, why not let it grow into a… Blight Drake? That’s basically what I am trying right now.
The foundation of the model is a Blight Drone with a Tervigon’s spawning sack in the middle. I got the Blight Drone cheap on ebay… and it turned out to be a recast, which sucks. The quality of the cast is bad and the resin is brittle as hell, so all the details like the cables broke of by just looking at them. Not good at all. At the same time, I will have to do a lot of sculpting work anyway, so I will “just” spend some more time on fixing the crappy recast issues. One thing I learned already for the future: I will only order direct from Forgeworld again, even though I might hack and cut the miniature to bits and pieces for a conversion.
First step was to build the frame. After gluing the head- and tailpieces to the spawning sack – they were fixed with aluminum rod – I glued sprue pieces as some kind of artificial bones into belly to stabilize it. I also (something I forgot when I built the Daemon Prince) also inserted a piece of plastic rot for the custom flight stand in the middle of the daemon engine. While going crazy with the plastic rod I also added connection struts for the rotor arms and the exhaust pipes.
To get the base shape I crammed aluminum foil into the body, pressed and squeezed it around until I was happy and covered it up with green stuff – I trick I learned from good friend of mine (thanks Flo!).
After the base shape was established I started with the work on the belly. First I added some metal straps because the Blight Drone has those as well; they are basically holding the whole wobbly body together and I want this to be reflected on the whole model. To make sure they look consistent I removed all the resin studs from the Blight Drone pieces and replaced them with the “water-filter”-ones I used for the big straps on the neck and the belly. After adding some machine parts – I used bits and pieces from the Thanquol & Boneripper and the Stormfiends kits (I have more plans with those guys for the Nurgle force) – I started with the sculpting of the skin.
As with the Daemon Prince I want the look of the skin to be consistent. So I either sand of all the details of the skin of the Blight Drone or I re-sculpt the belly in a way that it looks the same. I go with the latter option. It is more work (and I have no idea if I can pull it off), but it also looks more disgusting.
While glue/green stuff was drying I worked on the rotors. As the whole body is bigger, those need to be bigger as well. At first I was a bit puzzled how to re-build them, but after a visit in the hobby- and the do-it-yourself stores I got plenty of plastic tubes, a drainpipe and a rough idea. Getting the base construction wasn’t too complicated, even though the sawing of the big grey drainpipe drove me crazy: I just wasn’t able to get two similar and (that was the hardest part) straight pieces. Around 7 attempts (including a lot of swearing, the usage of different saws and the building of a weird Skaven-style construction to keep everything in place) later I had two pieces that were good enough…they weren’t perfect, but they will be covered in green stuff anyway.
Building the inner construction with the plastic tubes was a lot of fun and I begin to understand why (especially Ork) players love to build custom vehicles. For cutting the rotors out of the rather thick plastic boards (2,5mm) I bought a special compass (with a knife instead of a needle/pencil lead). I took some time and some additional sanding, but without this tool I wouldn’t have been able to get the rotors the way I wanted them.
That’s it for now. I will continue sculpting the belly and, while waiting for the green stuff to get hard, drill more corrosion holes in the rotors.
Abonnieren
Posts (Atom)